Getting Started
This guide will walk you through setting up your account, creating your first content moderation policy, and beginning to moderate content. By the end of this section, you'll have a fully functional moderation system up and running.
Creating Your Organization
The first step is establishing your organization within Deep Mod. During registration, you'll create both your user account and your organization simultaneously, along with setting up your subscription plan.
Registration Process
When you sign up for Deep Mod, you'll be prompted to provide your organization name and select a subscription plan that matches your expected volume and team size. We'll automatically create the following:
-
Your organization workspace with initial settings
-
An API key for programmatic access (needed for integration)
-
A client secret for webhook signature verification
Team Management
Once your organization is created, you can invite team members and assign appropriate roles. Navigate to the Organization Settings to manage users, where you can:
-
Send invitations to team members via email
-
Assign roles based on responsibilities:
-
Owner: Full access including billing and organization deletion
-
Admin: Manage policies, users, and settings
-
Member: Create and manage policies, view analytics
-
-
Manage access permissions for different features
-
View your API key and client secret
When you're ready to integrate Deep Mod programmatically with your applications, confirm that you have access to your API key and client secret in the Organization Settings. These credentials will be essential for making API calls and verifying webhook notifications.
Authoring Your First Policy
A policy is the foundation of your content moderation system. It contains the rules and settings that determine how content is evaluated and what actions are taken based on the results.
Three Ways to Create Policies
Deep Mod offers three approaches for creating policies:
Policy Templates - Browse and clone from pre-built, industry-specific policies (Social Media, E-commerce, Gaming, Healthcare, Financial Services, etc.) designed by content moderation experts. Navigate to Policies → Templates to view available templates. Each template comes with comprehensive rules, optimized settings, and regulatory awareness. Simply click "Clone Template" to create an instant copy for your organization that you can customize as needed.
Automatic Generation - Upload an existing policy document (PDF) and let our AI automatically extract and structure it into organized policies, rule groups, and rules. This is ideal if you already have written policies, community guidelines, or content standards documented. See the Automatic Policy Generation guide for details.
Manual Creation - Build policies from scratch by defining rules, groups, and settings yourself. This gives you complete control over every aspect of your policy structure and is best for unique use cases or learning through hands-on creation.
For this guide, we'll focus on manual creation. However, if your use case aligns with a common industry pattern, consider starting with a policy template for the fastest path to production.
Creating Your Policy Manually
Navigate to the Policies section in your dashboard and click "New Policy" to begin. Give your policy a descriptive name that reflects its purpose, such as "Community Guidelines" or "Product Review Standards."
Adding Rule Groups
Organize your rules into logical groups to make your policy easier to manage and understand. Common groupings include:
-
Safety: Rules related to user protection, harassment, and harmful content
-
Legal: Compliance requirements, copyright issues, and regulatory concerns
-
Brand: Guidelines for maintaining brand standards and appropriate messaging
-
Spam: Detection of unwanted promotional content and repetitive posts
Creating Effective Rules
Start with 6-8 high-impact rules that address your most critical content issues. Each rule should clearly describe what content should be avoided. For example:
-
"Must not contain hate speech or discriminatory language"
-
"Must not include personally identifiable information"
-
"Must not promote violence or illegal activities"
-
"Must not contain excessive promotional content"
Write rules in clear, specific language that both humans and AI can understand. Avoid overly broad or vague statements that might catch legitimate content unintentionally. The more specific a rule is, the more accurate the results will be.
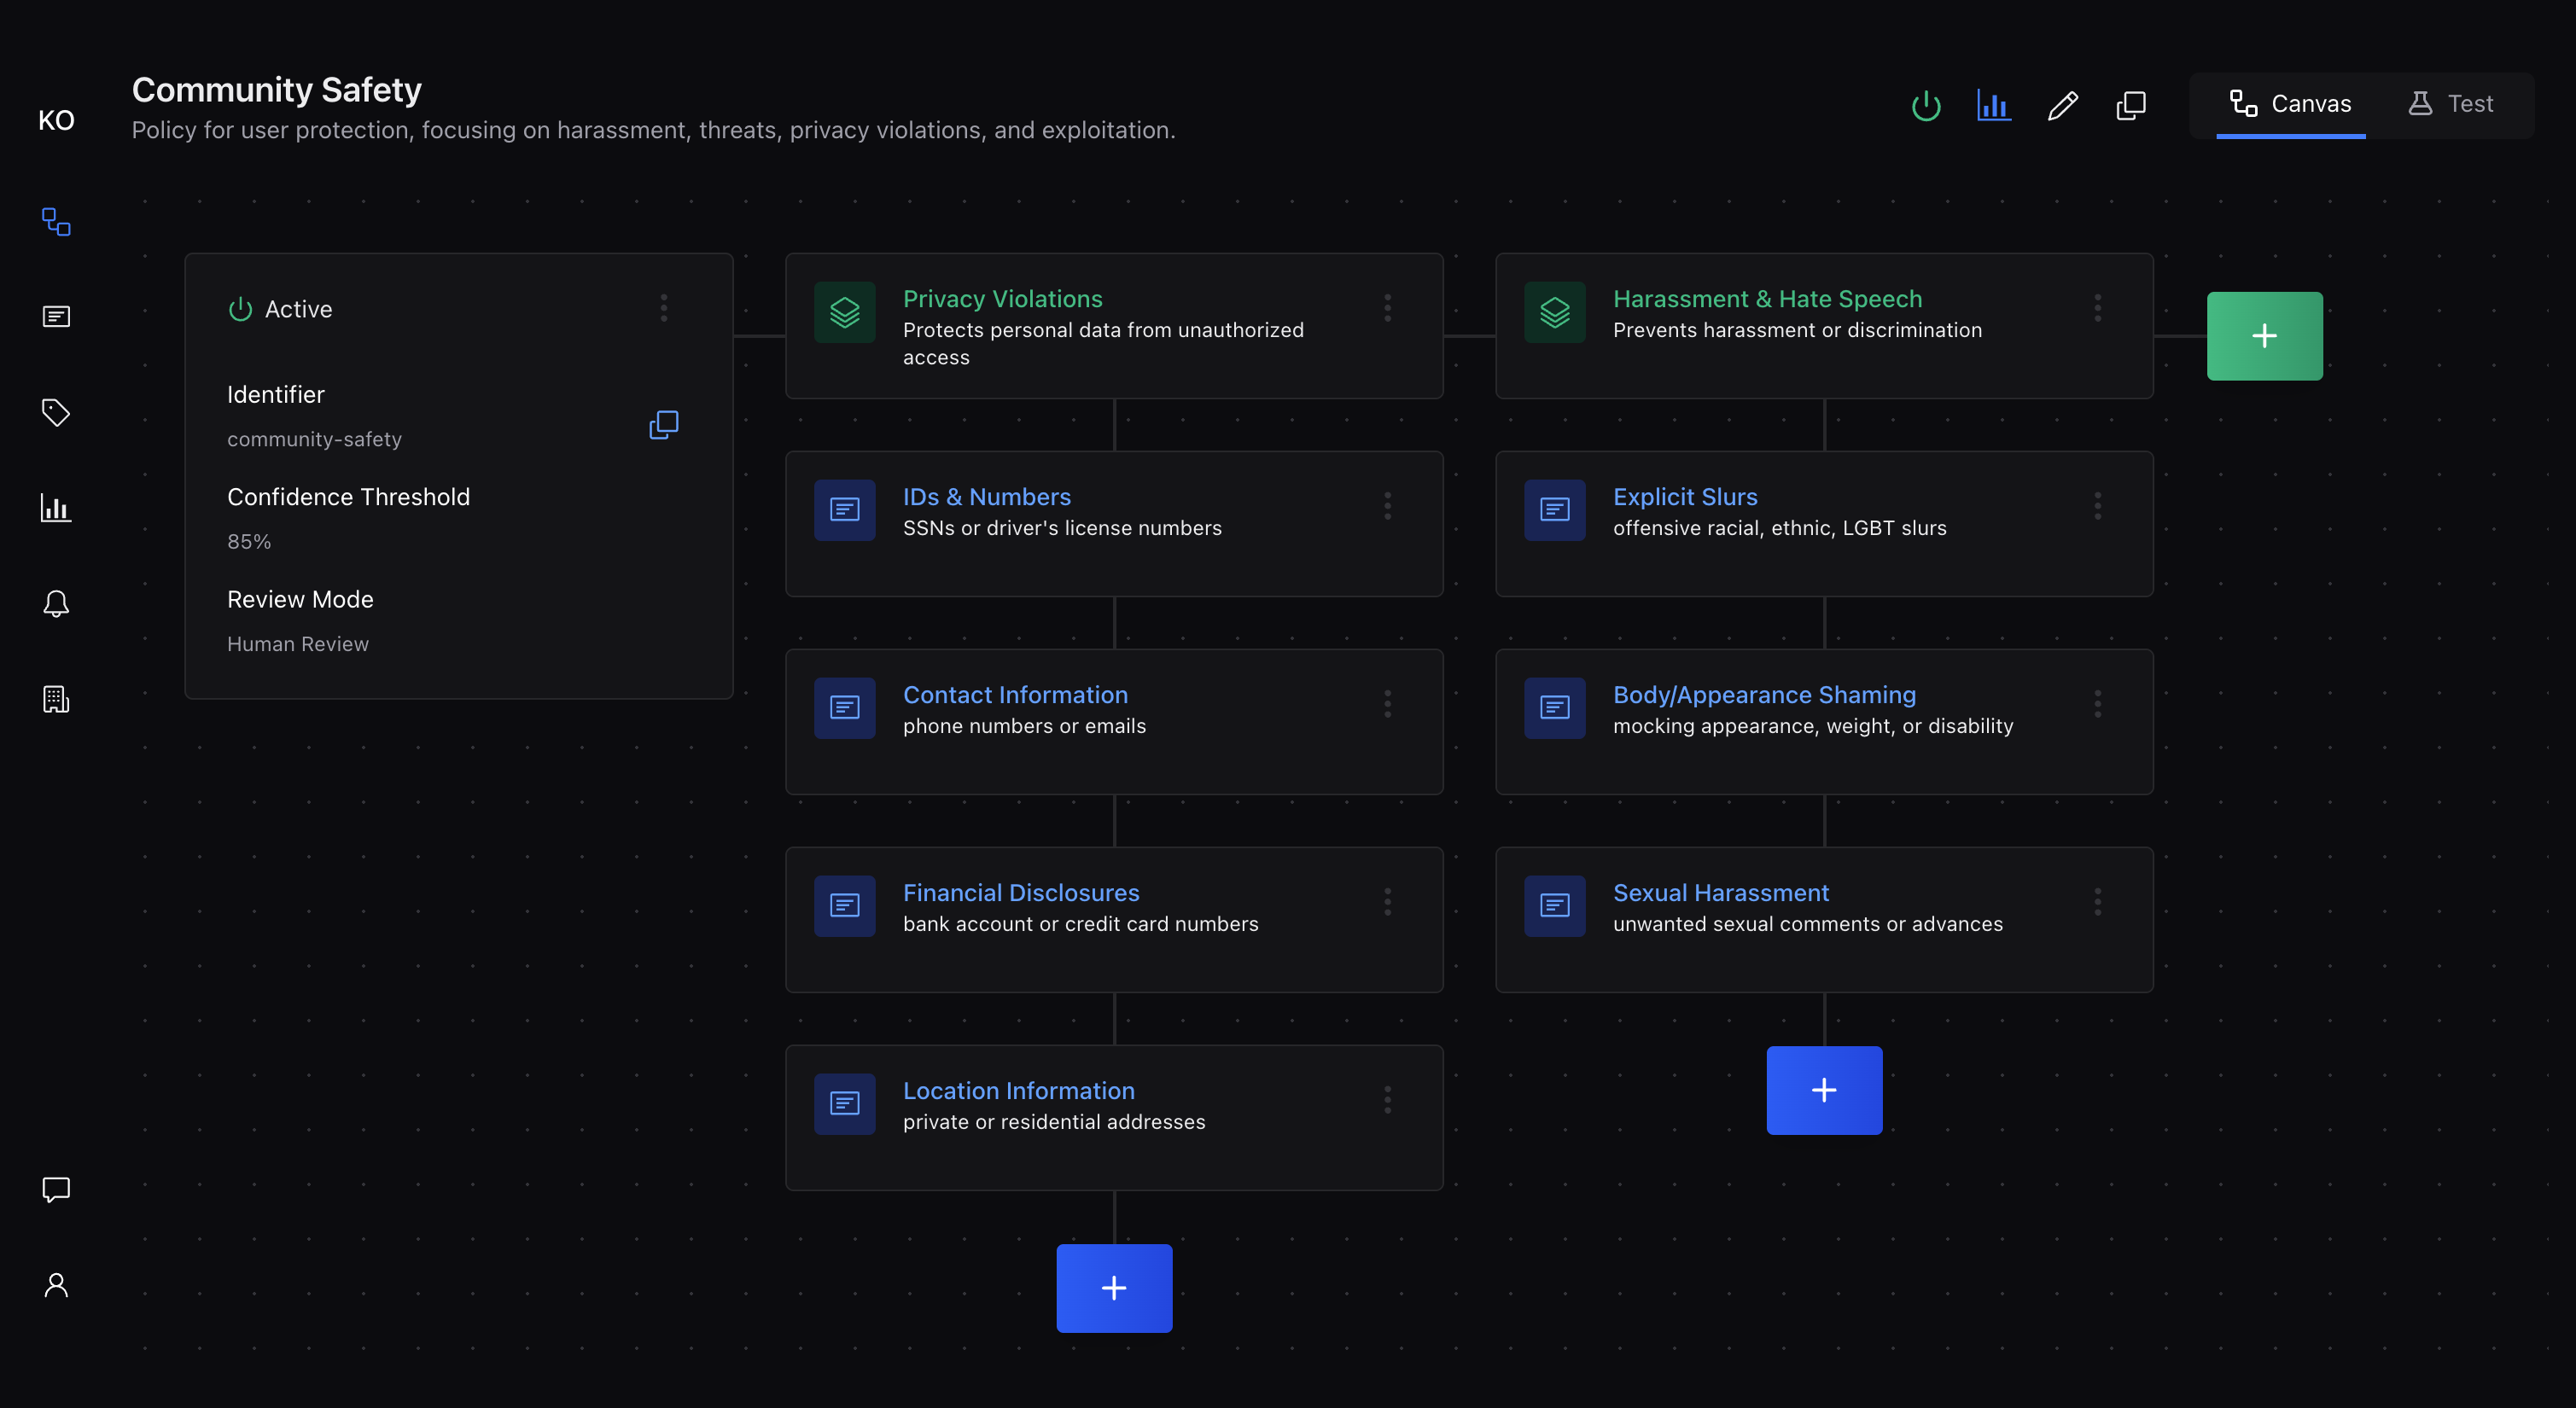
Confidence Thresholds
The confidence threshold determines how certain the AI must be before making a decision. Start with a conservative setting (70-80%) to minimize false positives while you learn how the system behaves with your content.
Choosing Review Mode
Select between two review modes:
-
No Review: All decisions are made automatically based on confidence thresholds. Content is marked as
success(passes) orfailure(violates rules). -
Human Review: When the AI's confidence falls below your threshold, the result is marked as
ambiguousand queued for human review instead of making an automatic decision.
For your first policy, start with No Review mode to see how the system performs, then enable Human Review once you understand the patterns and volume of ambiguous cases.
Configuring Webhooks
Webhooks allow Deep Mod to automatically notify your application when moderation is complete, enabling seamless integration into your content workflow. Webhooks are configured at the organization level in your Organization Settings.
Setting Up Your Webhook Endpoint
In your Organization Settings, navigate to the Webhook section to configure your webhook URL where Deep Mod should send moderation results. This endpoint should be publicly accessible and capable of receiving POST requests with JSON payloads.
Each webhook request includes a signature that you can optionally verify to ensure the request genuinely comes from Deep Mod. While verification is not required, it's strongly recommended for production environments. The system provides you with a client secret that you can use to compute and verify these signatures.
Testing Webhook Delivery
After configuring your webhook URL, send a test request to verify that your endpoint receives and processes notifications correctly. Check that your handler can parse the JSON payload and extract the moderation results. your handler can parse the JSON payload and extract the moderation results.
Here's what a typical webhook payload looks like:
{
  "id": "job_abc123def456",
  "type": "Moderation.Completed",
  "data": {
    "moderation": {
      "policy": "community-guidelines",
      "result": "success",
      "ruleGroupResults": [
        {
          "name": "Content Safety",
          "result": "success",
          "ruleResults": [
            {
              "ruleId": 1,
              "condition": "must not contain harmful content",
              "result": "success",
              "averageConfidence": 0.95,
              "matchedContent": [
                {
                  "content": null,
                  "confidence": 0.95
                }
              ]
            }
          ],
          "averageConfidence": 0.95
        }
      ],
      "averageConfidence": 0.95,
      "reviewed": false,
      "reviewNote": null
    },
    "moderationRunId": 12345,
    "metadata": {
      "userId": "user_123",
      "postId": "post_123"
    },
    "tags": ["user-generated", "comments"]
  }
}Understanding Moderation Results:
|
Result |
Meaning |
|---|---|
|
|
Content passes all rules at or above the confidence threshold |
|
|
Content violates one or more rules at or above the confidence threshold |
|
|
Confidence is below threshold; requires human review (when Human Review mode is enabled) |
|
|
Policy was not executed (used in policy chaining when an earlier policy fails) |
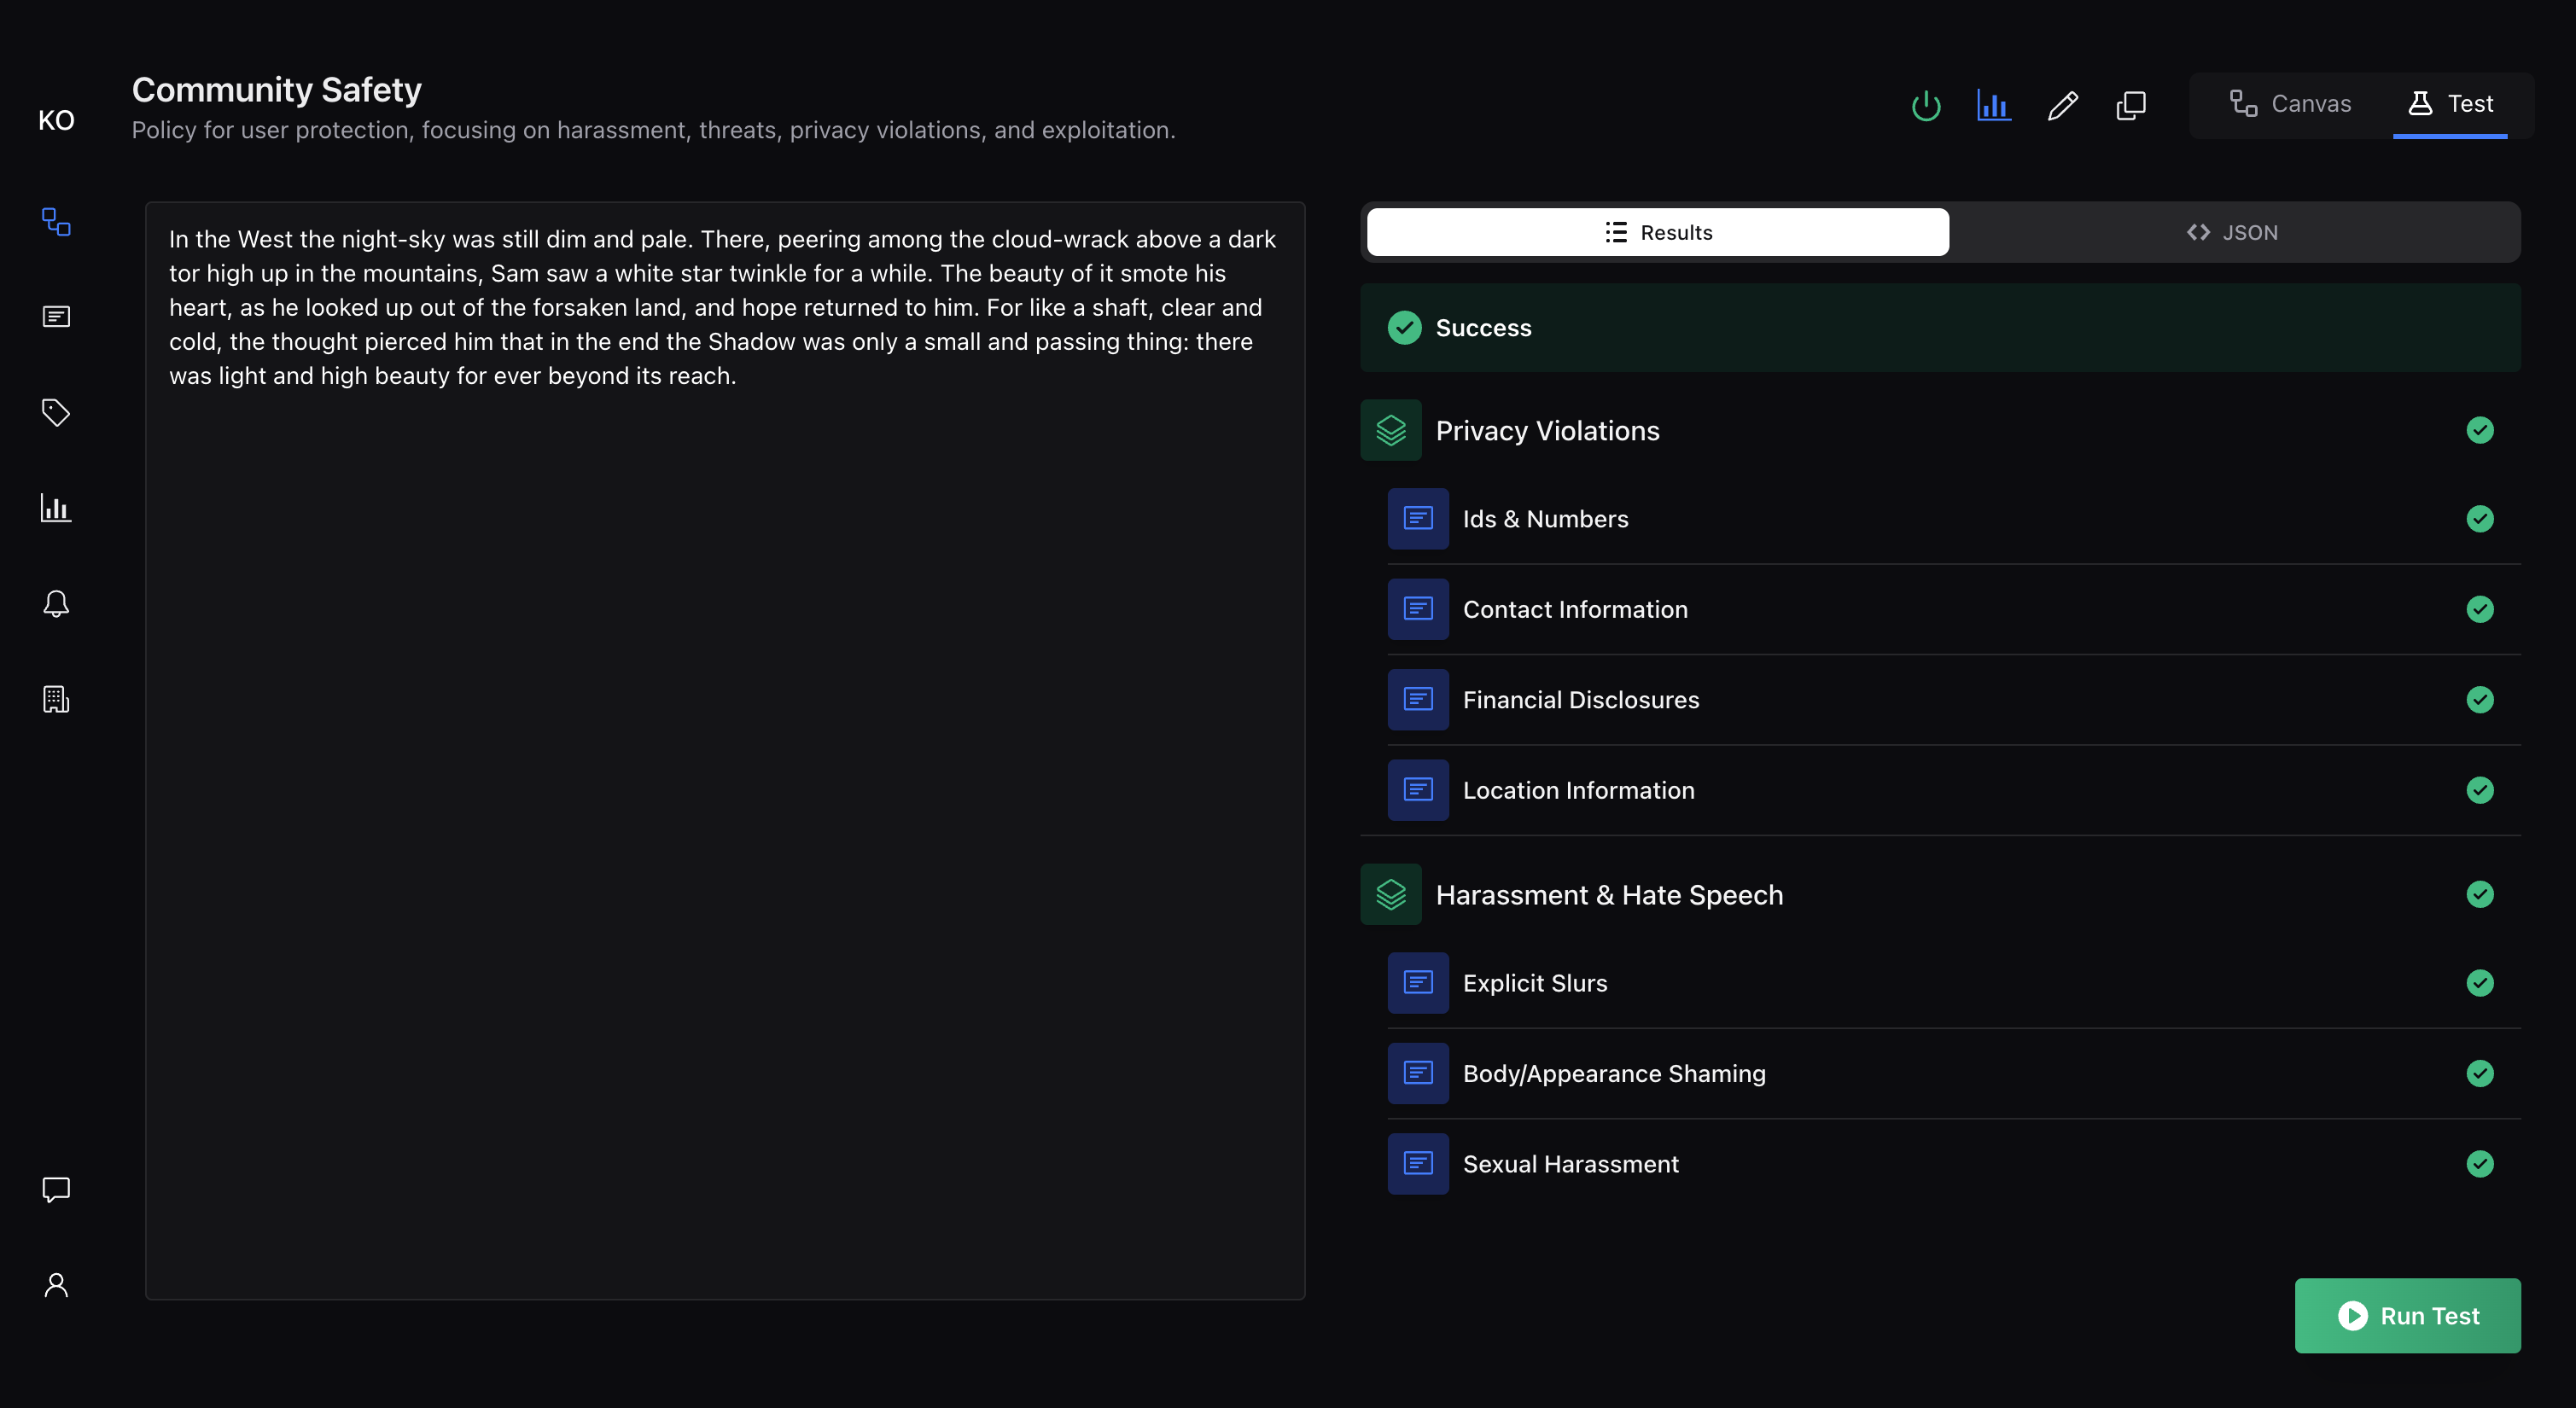
Testing Your Policy
Before activating your policy for production use, thoroughly test it with representative content samples to validate its behavior and tune its performance.
Using the Testing Interface:
Navigate to your policy and select the "Test" tab to access the testing interface. This tool allows you to:
-
Enter sample content directly into a text area
-
Submit the content for immediate evaluation
-
View results in both human-readable and JSON formats
-
See detailed breakdowns of how each rule performed
Choosing Test Content
Use 10-20 representative samples that reflect the actual content your users will submit. Include:
-
Content that should clearly pass your rules
-
Content that should obviously violate your policies
-
Edge cases or borderline content that might be ambiguous
-
Content in different languages or formats (if applicable)
Analyzing Test Results
Pay attention to each rule result. The system shows which rules were triggered, confidence scores for each decision, and overall reasoning. Look for:
-
Unexpected failures: Content you thought should pass but was flagged
-
Missed violations: Content that should have been caught but passed
-
Low confidence scores: Results that might benefit from rule refinement
-
Inconsistent results: Similar content receiving different outcomes
Based on your test results, adjust rule wording, confidence thresholds, or add new rules to address gaps. Re-test with the same content samples to validate improvements. Continue this process until you're satisfied with the balance between catching violations and avoiding false positives.
Moderating Content
Once you're confident in your policy's performance, it's time to activate it and begin moderating real content.
Policy Activation
In the Policies section, set your policy status to "Active." Only active policies can receive and process moderation requests from your applications or through the dashboard.
Important: You cannot activate a policy unless it has a valid webhook configured.
For immediate needs, you can submit content directly through the dashboard. Navigate to your active policy and use the test interface to evaluate individual pieces of content. Results appear immediately, showing the decision, reasoning, and confidence scores.
API Integration
For programmatic moderation, use your API key to submit content via our REST API. Production moderation is asynchronous—the API returns a job ID immediately, and results are delivered to your webhook endpoint when processing completes.
const response = await fetch('https://api.deepmod.ai/v1/moderation/run', {
  method: 'POST',
  headers: {
    'Authorization': `Bearer ${process.env.DEEPMOD_API_KEY}`,
    'Content-Type': 'application/json',
  },
  body: JSON.stringify({
    policyUri: 'your-policy-uri',
    content: 'Content to moderate',
    metadata: {
      userId: 'user123',
      source: 'comment',
    },
    tags: ['user-generated', 'public'],
  }),
});

const result = await response.json();
// Production moderation is async - results delivered via webhook
console.log('Moderation job ID:', result.moderationJobId);import requests
import os
response = requests.post('https://api.deepmod.ai/v1/moderation/run',
headers={
'Authorization': f"Bearer {os.environ['DEEPMOD_API_KEY']}",
'Content-Type': 'application/json'
},
json={
'policyUri': 'your-policy-uri',
'content': 'Content to moderate',
'metadata': {
'userId': 'user123',
'source': 'comment'
},
'tags': ['user-generated', 'public']
}
)
result = response.json()
# Production moderation is async - results delivered via webhook
print(f"Moderation job ID: {result['moderationJobId']}")<?php
$response = file_get_contents('https://api.deepmod.ai/v1/moderation/run', false,
stream_context_create([
'http' => [
'method' => 'POST',
'header' => [
'Authorization: Bearer ' . $_ENV['DEEPMOD_API_KEY'],
'Content-Type: application/json'
],
'content' => json_encode([
'policyUri' => 'your-policy-uri',
'content' => 'Content to moderate',
'metadata' => [
'userId' => 'user123',
'source' => 'comment'
],
'tags' => ['user-generated', 'public']
])
]
])
);
$result = json_decode($response, true);
// Production moderation is async - results delivered via webhook
echo "Moderation job ID: " . $result['moderationJobId'];
?>require 'net/http'
require 'json'
uri = URI('https://api.deepmod.ai/v1/moderation/run')
http = Net::HTTP.new(uri.host, uri.port)
http.use_ssl = true
request = Net::HTTP::Post.new(uri)
request['Authorization'] = "Bearer #{ENV['DEEPMOD_API_KEY']}"
request['Content-Type'] = 'application/json'
request.body = {
policyUri: 'your-policy-uri',
content: 'Content to moderate',
metadata: {
userId: 'user123',
source: 'comment'
},
tags: ['user-generated', 'public']
}.to_json
response = http.request(request)
result = JSON.parse(response.body)
# Production moderation is async - results delivered via webhook
puts "Moderation job ID: #{result['moderationJobId']}"Monitoring Your Queue
Once content begins flowing through your system, monitor the Moderation Queue regularly to understand patterns and performance. The queue shows recent moderation runs, their results, and any items requiring human review.
Readiness Checklist
Before going live with content moderation, ensure you've completed these essential steps:
-
[ ] Policy is active with at least one rule configured
-
[ ] Confidence threshold is set (start with 70-80%)
-
[ ] Review mode is selected (No Review or Human Review)
-
[ ] Policy testing completed with representative content samples
-
[ ] Webhook configured (required for production integrations)
-
[ ] Client secret stored securely for webhook verification
-
[ ] API key accessible in Organization Settings (if needed)
-
[ ] Team members invited with appropriate roles assigned
What's Next
With your basic setup complete, you're ready to begin moderating content effectively. Consider exploring these features and advanced topics:
-
Core Concepts - Deepen your understanding of policies, rules, and confidence thresholds
-
Running Moderation - Learn advanced techniques for scaling and optimizing your moderation
-
Human Review Workflows - Set up human oversight for complex decisions
-
Policy Authoring Best Practices - Advanced strategies for creating robust policies
Remember that content moderation is an iterative process. Regularly review your policy performance, gather feedback from your team, and refine your approach based on real-world usage patterns and evolving community needs.
Need help getting started? Contact our support team or check out our troubleshooting guide for solutions to common setup issues.